Magento v2
If you are already using Magento v2.x with your online store, Limepay can be added quickly and easily.
Installation
- Download the Limepay extension for Magento v2 .
- Extract the downloaded zip file to your desired location using a file extractor.
- Find and open the Magento root directory which can be found in your Magento installation files location.
-
If there is already an
appfolder in the root directory, use the merge function to add the new files. If there is no app folder in the root directory, move the extracted app folder into the root directory. Confirm the appropriate files are now in the app folder. - Depending on your version of Magento v2, run the following command lines to complete the installation:
| Magento version 2.1.8 or older | Magento version 2.1.9 or later |
|---|---|
php bin/magento setup:upgrade |
php bin/magento setup:upgrade |
php bin/magento setup:static-content:deploy |
php bin/magento setup:static-content:deploy -f |
- Ensure all Magento system permissions are applied. Use the Magento folders and permission reference if needed.
Magento v2 setup
With the Limepay extension installed, you are just a few steps away from activating it on your store page.
First log in to your Magento Admin Panel and go to Store > Configuration > Sales > Payment Methods.
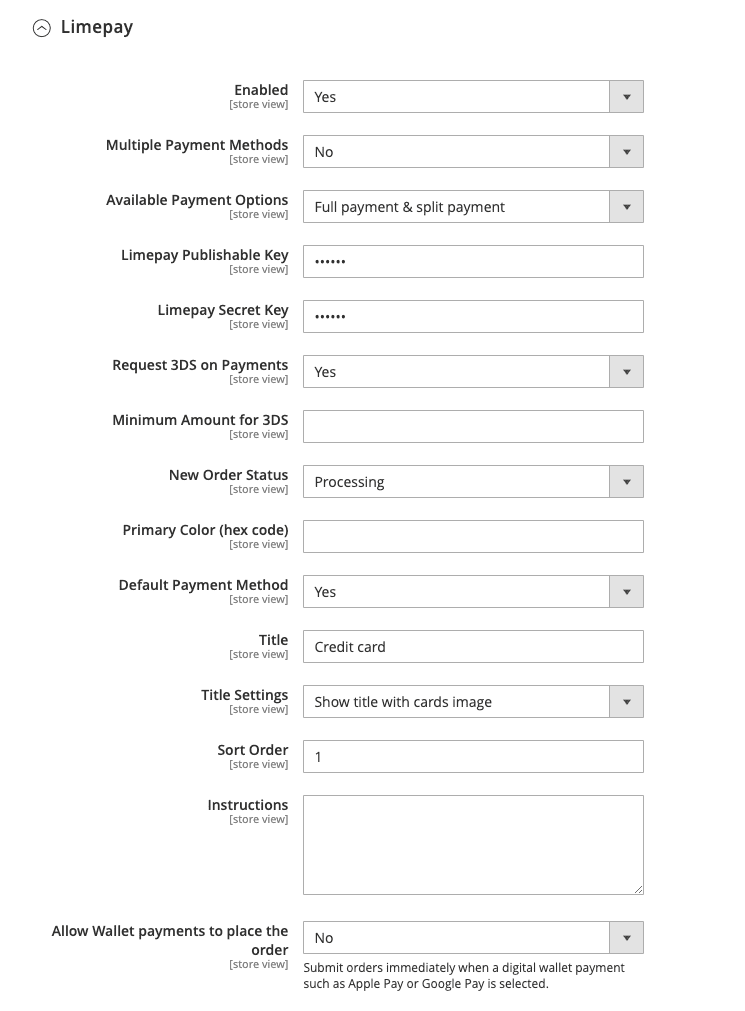
Click to expand Limepay.

- Enabled: Enable Limepay
- Multiple Payment Methods: When set to Yes, checkout will display Full and Split payment options as separate payment methods.
- Available Payment Options: Select your preferred payment options to be available in checkout.
- Limepay Publishable Key: Limepay publishable API key.
- Limepay Secret Key: Limepay secret API key.
- Request 3DS for Payments: When enabled, Limepay will be requested to perform 3DS challenge for payments.
- Minimum Amount for 3DS: [Optional] When an amount is set, 3DS challenge will not be requested for payments below the given amount. Leave empty if you intend to request 3DS challenge for all payments.
- New Order Status: Select your preferred order status.
- Primary Color: [Optional] Primary color of the checkout. Enter the hex code of the color.
- Default Payment Method: Set Limepay as default payment method.
- Title: Set the title as you prefer.
- Title Settings: Select whether you want to show card images with Title.
-
Sort Order:
Set this to
1so Limepay will appear on top of the payment methods list in checkout. - Instructions: [Optional] Instructions to appear in checkout.
- Allow Wallet payments to place the order: When set to Yes, Limepay will submit orders immediately when a digital wallet payment such as Apple Pay or Google Pay is selected.
Clear your cache by running the following command line: php bin/magento cache:clean
Return to and refresh your store page to see your new Limepay checkout.
Enable ApplePay and GooglePay
To enable ApplePay and GooglePay, please follow the instructions available in your Limepay Merchant Dashboard's Settings -> Checkout payment options section.
What's next?
Visit the testing documentation page to confirm the integration is fully functional.
Learn about and access the Limepay merchant dashboard.